


The BEST soft and chewy bread roll for hoagies/submarines/grinders. Pillowy soft rolls that are begging to be filled with deliciousness!


Truly The Best Hoagie Roll Recipe
As a Chef and Pizzaiola with over 35 years of professional experience, I know hoagie rolls. This recipe has been in my family for generations. It is versatile (think dinner rolls or bread bowls for soup) and also makes the absolute best hoagie roll. We’re talking pizzeria/sub-shop-style hoagies.
The inside is super fluffy and chewy with a slight crust out the outside. Whether you eat them as a cold sub or as a toasted Italian hoagie, you will never need to step into a sub shop again!
TKW Family Love
2nd time I’m making this recipe. It comes out perfect each time!! I made Philly Cheesesteaks with them and honestly can’t get enough!!! Thank you for sharing this beautiful recipe!


This is a VERY detailed post with a ton of tips, techniques, and tutorials. I strongly advise you to read the post BEFORE you make the rolls. Yes, it’s a VERY easy recipe, but I tried to address many of your FAQs. For ease of reading, I’ve sectioned it as follows:
Depending on which part of the country or the world you’re from, these things go by various names. I’ve heard “Subs, Submarines, Hoagies, Grinders, Hero, Italian Sandwich, Torpedo, Blimpie, Po’Boy, and Rocket” just to name a few.
Whatever you call it, I’m talking about those luxurious sandwiches full of meats and cheeses, then wedged into a chewy, soft bread roll.

Hoagie Bun Ingredients
- Bread Flour – it must be at least 11-14% protein content
- Yeast – Active Dry or Instant
- Water
- Salt
- Sugar
- Butter
- Items for a bread wash *optional

Can I use All-Purpose Flour?
I’d advise against it because you’ll end up with a different texture and outcome. Yes, you can, but the outcomes differ.
- You won’t get the same result with US all-purpose flour as you would with bread flour. The higher protein in bread flour is what gives the bread its “chew” and rise
- Plus, AP flour will make the bread denser. You can use it, but they won’t be like classic hoagie rolls, but they still will taste yummy
If bread flour is hard to find, grab some Vital Wheat Gluten and make your bread flour using your AP Flour.
I have the formula on my blog. Check out this post on how to make your own bread flour.
Working with yeast – no fears, you got this!
One of the comments I get most often when I ask why folks don’t make homemade bread at home is that they are afraid of it. They are either afraid to work with yeast or unsure about the techniques. Well, that’s where I’m here to help you.
Baking bread, rolls, and dough is something I honestly find truly cathartic. It’s relaxing to use the stand mixer or to knead the dough by hand. It’s pretty foolproof because I use only Red Star Yeasts (99.9% of the time it’s their Platinum).
- Store your yeast in a dark, cool area. I tend to store mine in the fridge or the freezer for extended storage.
- When adding it, use very warm liquids (120-130°F). You don’t want to add it to boiling or super-hot water, as you will kill the yeast.
- With the Instant Platinum yeast, you don’t even have to let it proof first – like how I added it to this recipe. Because I use the Instant Active Dry yeast, there’s no proofing involved.
- To Proof, Active Dry Yeast, place a portion of the warm liquid in a bowl and add the yeast. Give it a little stir, then let it sit for 1-5 minutes, or until the yeast is completely dissolved. It should bubble up and “bloom”
- If, after 5 minutes, the yeast isn’t bloomed then your yeast is old (expiration dates matter here!) or the liquid you used is too hot

TKW Family Love
Well, this recipe was a big ole SUCCESS!!! Gosh, rave reviews all around and even my uncle — a Jimmy John’s aficionado — said this was the best bread they’ve ever had. ONLY alteration I did was use lard over butter.. because that’s what I usually do for bread minus foccacia of course! 😆
Thank you so much for this very well explained guide! I’ll admit, I’ve got a lot of bread baking under my belt but I always struggled with the shaping part of the equation. Followed your directions and boom, perfect lil’ hoagies. I’m going to try cold fermenting them next time for an even more delicious flavor, I can’t imagine them getting any better though!
How to make a Hoagie Roll
Feel good about working with yeast? You should. It’s really easy, and just don’t be afraid! You can do this! Baking is a science, and when you add ingredients, it matters. Plus, we need to discuss how humidity can affect the amount of water you put in.
Active Dry yeast
- Proof the Yeast: In the bowl of your stand mixer, combine the active dry yeast, sugar, and 1/4 cup plus 2 tablespoons of warm water. Whisk together, then set aside for 5 to 10 minutes, until the yeast becomes foamy and visibly bubbly.
- Initial Mix: Attach the dough hook to your mixer. To the bowl with the proofed yeast, add 2 cups of flour and the remaining 1 cup of warm water. Turn the mixer to low and mix for 4 minutes.
- Knead & Adjust: Add the salt and the remaining flour (1 cup at a time). Increase the mixer speed to medium and mix for 5 to 6 minutes until the dough becomes slack (see note).
- Hydration Check (If Needed): If the dough isn’t slack after 5 to 6 minutes, add additional warm water 1 tablespoon at a time (up to 1/4 cup extra, for a total of 1 1/2 cups water). Note: The exact amount of extra water needed depends on your room’s humidity.
Instant yeast
- Initial Mix: In the bowl of a stand mixer fitted with the dough hook, add 2 cups of flour, the water, sugar, and instant yeast. Turn the mixer to low and mix for 4 minutes.
- Knead & Adjust: Add the salt and the remaining flour (1 cup at a time). Increase the mixer speed to medium and mix for 5 to 6 minutes until the dough becomes slack (see note).
- Hydration Check (If Needed): If the dough isn’t slack after 5 to 6 minutes, add additional warm water 1 tablespoon at a time (up to 1/4 cup extra, for a total of 1 1/2 cups water). Note: The exact amount of extra water needed depends on your room’s humidity.
Now, depending on the kitchen temperature or humidity, you can add anywhere from 3 1/2 to 4 cups of flour. Just go slow. The worst thing you can do is add too much flour because you’re impatient. At this point, your dough should start to look and feel “Slack”


What is Slack Dough?
Imagine a blob. It’s soft and flowing, but not quite liquid. If you tipped the dough onto a work surface and tried to shape it, it would simply spread back out into a blob instead of holding its form.
That’s what bakers mean by slack dough. Slack dough has very little elasticity or strength, so it won’t spring back or maintain its shape. It’s a high-hydration dough that’s wet without being runny, with a soft, billowy texture.
Below is what Slack dough looks like:


How Humidity affects dough and bread baking
If your bread dough never turns slack, there can be 2 reasons for this
- You didn’t mix it enough. Give it another minute or two. If it still doesn’t turn slack, add a tablespoon of water at a time until it forms slack.
- Your house is super dry – add a bit more water.
The rule of thumb is that if your area is hot & humid, then reduce the liquid by 10%. Now, back to making the dough.

Add The Butter
- Once all the flour is added and the dough is slack, add in the butter one tablespoon at a time. Just like the flour, you’ll add it in slowly, allowing it to incorporate into the dough. Don’t panic if it doesn’t go in all at once or the dough looks like it’s breaking down. Just be patient; it’ll combine again. Patience – that’s the key.
Cold Butter or Softened Butter?
I was raised using cold butter in this recipe, though you may use room temperature or equal amounts of olive oil. When using cold butter, even though you ‘meld it into the flour’, you’re helping with gluten formation and the development of dough structure. I’ve made it with room-temperature butter, and it works just as well. You can use either, folks.

- Once it’s mostly in, turn the mixer to medium and mix the dough until it pulls completely away from the sides and is smooth and shiny.
- Transfer the dough to a large, lightly sprayed bowl.
- Cover with plastic wrap or use what I use – disposable clear plastic shower caps. They have a stretchy band that snaps around the bowl and stays inflated, allowing the dough to proof without sticking to it.
- Once it’s doubled in size, it’s time to shape the hoagie rolls.
How to shape Hoagie Buns
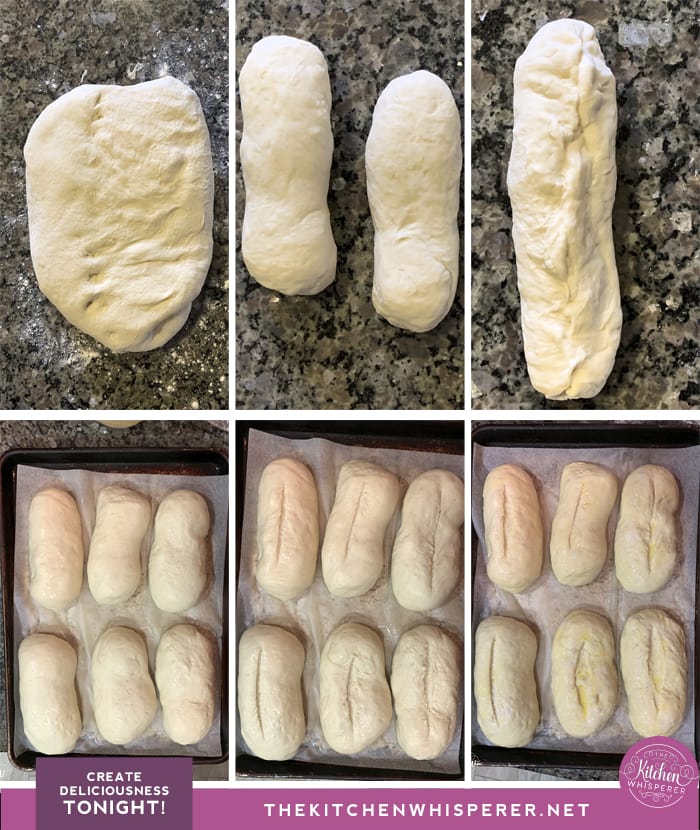
- Punch the dough down and place it on a very lightly floured board. I would advise using as little flour as possible when shaping these. The more flour you add, the tougher the hoagies will be.
- Divide into 4-8 pieces and shape. *See below on how to shape!
- Once shaped, transfer to a parchment-lined tray and cover with lightly sprayed plastic wrap. Allow to rise again until almost doubled. ~30-45 minutes. Do NOT overproof them; otherwise, they will fall flat.
What does Overproof mean?
In simple terms, it means the dough was left to rise too long. It will almost “super balloon” in size. You’ll know you’ve over-proofed dough if, when you poke it for 2 seconds, you remove your finger and see if it springs back. If your dough does not spring back, it’s over-proofed.
But that doesn’t mean all is lost. Simply remove the dough from where it was rising, degas it (press down firmly on the dough to release the gas), then reshape. Place it back on your pan and repeat the second proofing.
Watch your dough – things like ambient temperature, humidity, etc will cause your dough to rise slower or faster. The 30-45 minutes is a fairly standard time, but you need to use your judgment in the kitchen.
TKW Family Love
I just pulled my rolls from the oven. They turned out perfectly! The recipe is very clear and easy to follow. I just tested a roll to make sure it wasn’t poisonous and ohhhhh my goodness…..soft and pillowey on the inside, and a nice soft yet chewy outside. Not chewy but a good bite to it. It is going to be perfect for my leftover prime rib to make French dip sandwiches for supper. Thank you!
Chef’s Tips on shaping hoagie rolls
Shaping does take practice, but that’s the fun of baking, right?!

- Flatten the Dough: After dividing your dough into pieces (4 to 8 depending on desired size), gently pat each piece with your fingers into a 1/4-inch-thick rectangle.
- First Envelope Fold: Fold the bottom third of the dough up to the center. Then, fold the top quarter down toward the center (like an envelope) and press gently to seal.
- Second Envelope Fold: Rotate the dough 180° (so the seam faces away from you) and repeat the exact same folding process. Use your hands to seal the seams tightly as you fold—this creates the essential internal structure for a fluffy roll!
- Seal and Roll: Your dough will now resemble a thick log. Cup your hand over the center and gently roll it back and forth to reinforce the seal, building out the full length of the log. If needed, pinch any open seams closed with your fingers.
- Gently Stretch: Lightly grab both ends of the log and pull outward just an inch or two to reach your desired hoagie length.
- Shape the Ends: Cup a hand over each end of the roll and gently move them in opposite, back-and-forth directions to round out the tips, then tuck the excess dough slightly underneath.
Adding Slashes/Slits
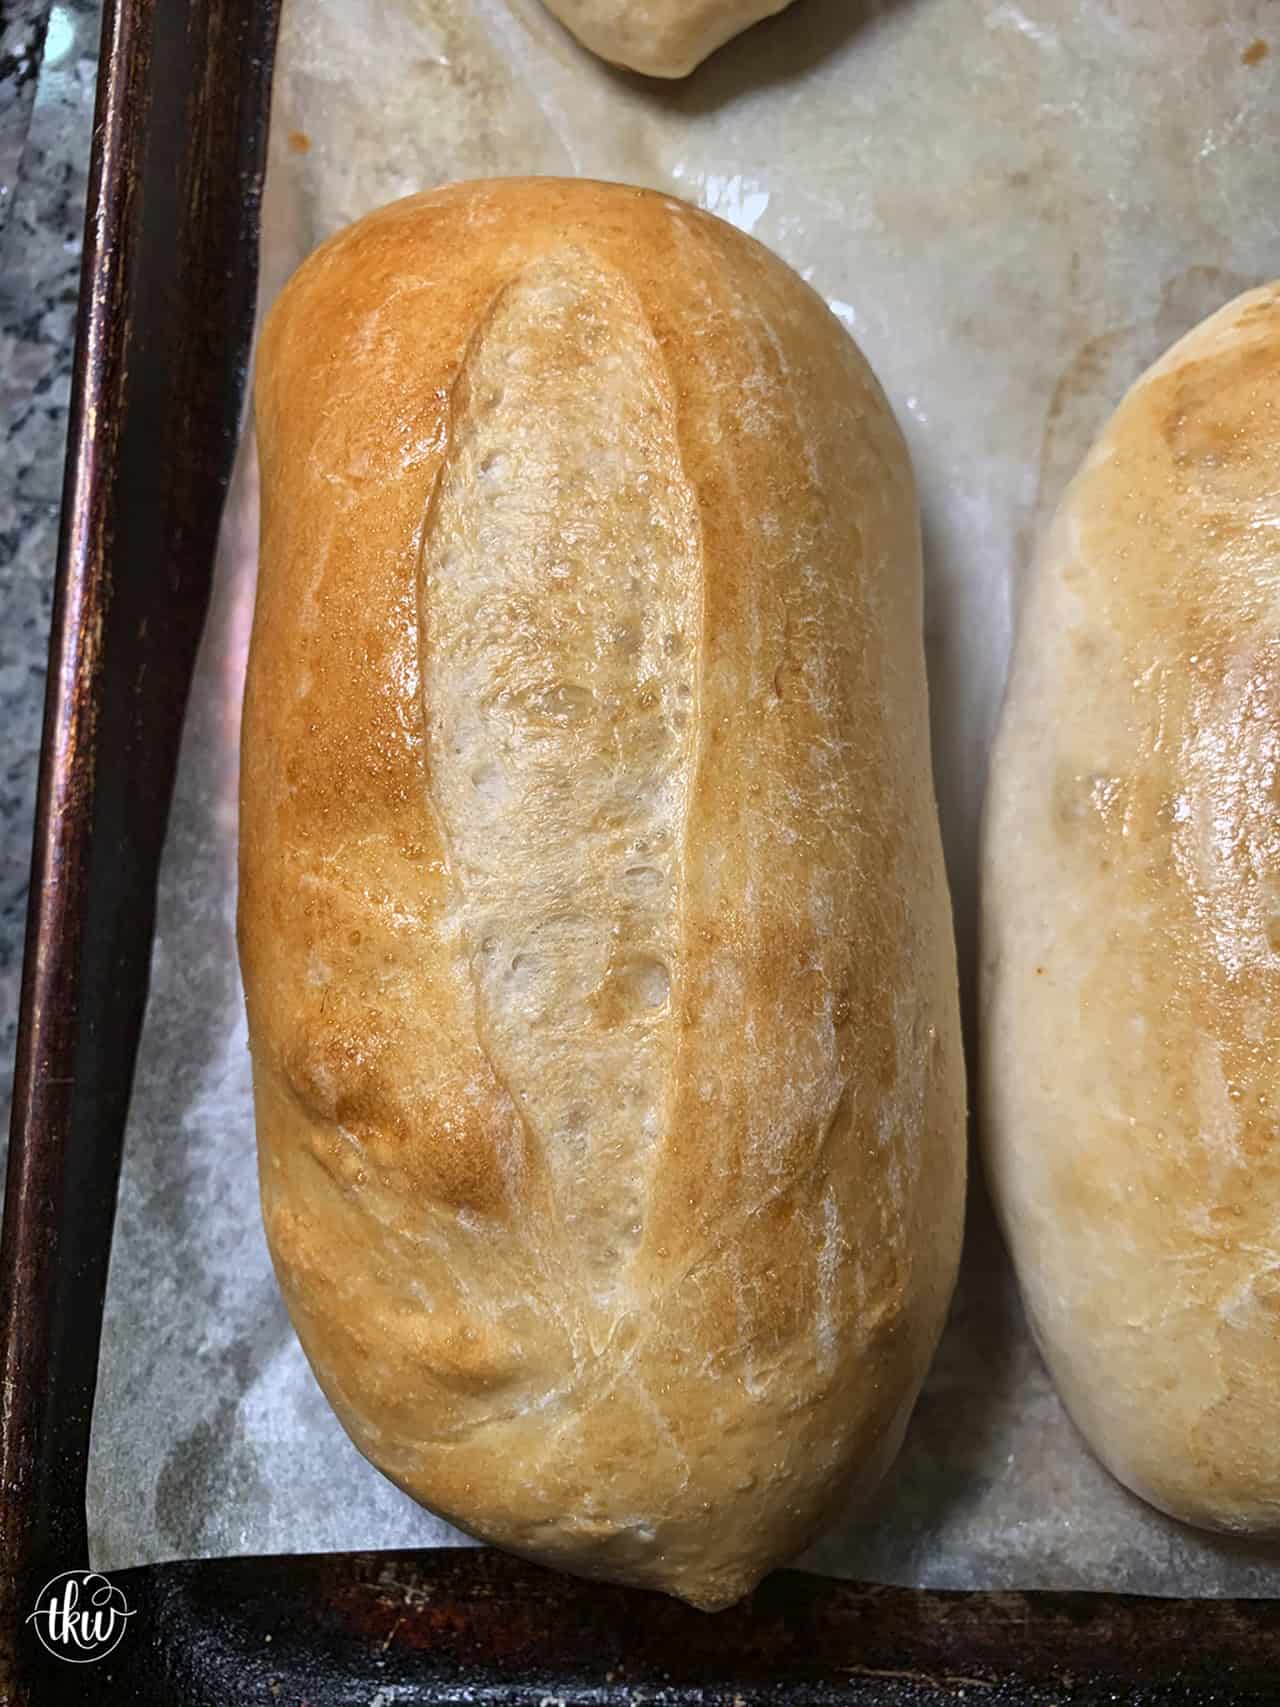
While completely not necessary, you can add slashes/slits to the rolls before they bake to give them a prettier look. Cutting them adds zero taste value; it just pretties them up.
However, it does help with the texture. Did you ever make or buy bread that has a huge bubble or has a blowout? The bread “ruptures,” in a sense. By scoring the bread, you can help control where gas can escape without ruining its appearance.

Bread Lame
A lame is a handle with a very thin razor blade at the end, specifically used for slashing bread. In a quick motion, make a slash (or multiple slashes) down the center of the bread, but do not go in deep. You’re going in maybe a 1/4″ at best.
I use a Lame to do mine.
Can I use a sharp knife instead?

I would say no, as the blade isn’t thin enough, and the knife may not be super, SUPER sharp. You could risk tearing the bread instead of a quick, pretty slash.
Coating your rolls before baking

You do not have to coat these if you do not want to. They will bake up beautifully and taste amazing, BUT they won’t really have that deep color, crust, or shine like the ones most pizzerias have. Again, not a bad thing. Go with what you like.
When it comes to these rolls, the coating application you use will determine the results. For my hoagie rolls, I use an egg white mixed with just a Tablespoon of milk
- Whole egg: This will give your bread a sheen and color
- Egg Yolk: This will give your bread color and will help brown it
- Egg White: Will give you a firmer crust
- Milk: will give your crust color
- Butter: will make your crust softer and richer
- Egg White with Milk: will give you a firmer crust and deeper crust color
Cutting your hoagie rolls
At first cut, the bread insides are so soft and billowy. It’s as if it’s held together by pockets of air and strands of sweet dough.

While it’s hard to resist, I HIGHLY recommend waiting about 10 minutes before slicing into these hoagie rolls. If you don’t, you risk tearing the bread (even with the best bread knives) because it’s simply too hot and too soft inside.
Trust me on this; it’s worth the wait!

I would HIGHLY recommend using a quality bread knife to slice these, as the rolls are soft and chewy, and nothing is worse than cutting into them with a crappy knife! You’ll love this knife! Sani-Safe S162-8SC-PCP 8″ Scalloped Bread Knife with Polypropylene Handle Pan is a great knife that’s affordable!

Chef Tips & FAQs About Bread Baking
- Can I use a bread machine to make the dough? Yes! You can use a bread machine to mix and knead the dough, but you’ll want to follow the recipe’s instructions for proofing and shaping rather than letting the bread machine complete its normal bread cycle.
The important thing is to remove the dough from the machine once the mixing/kneading portion is complete, then continue with the recipe as written. - Why does my dough seem too wet or too dry? Humidity and heat in your kitchen can have a huge impact on your dough. Your environment affects both the texture of the dough while mixing and how quickly it proofs.
Make small adjustments as needed, but don’t immediately start adding more flour or water. Give the dough time to come together. - Why is my dough rising faster than the recipe says it should? If your kitchen is warmer, your dough will rise faster. Think of bread dough like a toddler; you really can’t leave it unsupervised for very long!
Use the proofing times in the recipe as a guideline, but your eyes are your best judge. Learn to watch the dough rather than relying solely on the clock. - How do I know if I’ve overproofed my dough? Overproofing can cause your bread to fall flat when it bakes. Once the dough has proofed too long, the gluten structure becomes too weak to hold all of the gas produced by the yeast.
Keep an eye on your dough, especially during the second proof. Don’t let it go simply because the recipe says it needs more time. - Why did my bread lose its volume when I shaped it? Use gentle hands when shaping your dough! Your dough has spent all that time developing gas and structure during proofing. If you handle it too roughly, you can knock out too much of that gas.
Be gentle and deliberate when shaping so you preserve the structure you’ve worked so hard to develop. - Why isn’t my dough coming together? One of the biggest culprits is not mixing the dough enough before the first proof.
And remember: PATIENCE! Don’t immediately start dumping in more flour or water because the dough isn’t coming together right away. Give it time to develop. - How important is the yeast? Very! Make sure your yeast isn’t expired. Old or inactive yeast can prevent your dough from rising properly, no matter how perfectly you follow the rest of the recipe.
- Why did my bread burn on the outside but stay raw inside? Your oven could be the culprit. Keep an eye on your oven as your bread bakes. If your oven thermostat isn’t working properly, the actual temperature may differ significantly from what the oven displays.
An oven that is running too hot can cause the outside of your bread to brown or burn before the inside has finished baking. - Quick Troubleshooting: What are the biggest things that can go wrong? If your bread doesn’t turn out perfectly, don’t panic! Before assuming the recipe failed, check these common culprits:
- Didn’t mix the dough enough before the first proof.
- Handled the dough too roughly during shaping and knocked out too much gas.
- Overproofed the dough, particularly during the second proof, causing it to collapse in the oven.
- Your oven thermostat is inaccurate, causing the bread to bake too quickly or at the wrong temperature.
- Added too much flour or water too quickly, instead of letting the dough come together.
There’s no limit to how you can use these hoagie rolls or what you can put in or on them.


How to serve Homemade Hoagie Rolls
- Italian Rocket Hoagie or any favorite hoagie topping such as steak, meatball, cheese, pizza… You get the idea!)
- Meatball Hoagie like the pics below – use any of my meatball recipes, top with sauce of choice, cheese, and bake at 400F for 10-15 minutes or until the cheese is melted
- French Bread Pizza – split in half, top each side with cheese and pizza toppings. Bake at 400F until the cheese is melted
- Stuffed Breakfast Boats – these were such a HUGE seller at our pizzeria (even though they were on the ‘secret’ menu
- Make them smaller as dinner rolls and, while still warm, top with honey cinnamon butter right before serving
How to store your Best Soft and Chewy Hoagie Rolls
Store them uncut. When you’re storing overnight, you’ll want to store it in a paper bag OR, wrapped tightly in plastic wrap and then in a plastic bag. Air is your enemy here.


How to Freeze Hoagie Rolls
These rolls can be frozen either before or after baking.
Post-baking
- I prefer to freeze these after they are baked. Simply wrap each cooled loaf in plastic wrap twice and place it in a freezer-safe bag for up to 3 months.
Pre-baking
- If you do this, add a little more yeast (about a teaspoon more) to the recipe. This ensures that the post-freeze rise will give you a stunning result.
- Allow the dough to proof and then shape it on a parchment-lined pan.
- Wrap the pan with plastic wrap. Once each loaf is frozen stiff, wrap each roll twice in plastic wrap. Store in a freezer-safe bag for up to 6 months.
- To use frozen dough rolls, remove a loaf from the freezer the night before you want to bake it. Keep the loaf wrapped in plastic and let it thaw overnight in the refrigerator.
- Place the thawed dough in a greased bread pan, cover it, and let it rise in a warm, dry place. Bake the bread per the recipe below.

Cold Fermenting Your Dough
If you want, you can also cold-ferment this dough as soon as it comes together!
- Once the mixture is combined and forms a soft/smooth bread ball, you can add it to a buttered bowl/lidded large container and refrigerate it overnight.
- The next day, remove the container from the fridge to perform the first rise. Then, punch down, shape, and allow it to proof a second time. *Note: it will take longer to rise initially as it will be cold.
Subbing Sourdough Starter
I get asked this question a lot. I never use sourdough starter in this recipe, as I love it as-is; however, you can substitute sourdough starter with some recipe modifications.
- 8 ounces of ripened sourdough starter
- Reduce the total flour to 334-339 grams
- Reduce the total water to 177-237 grams

Using Whole Wheat Flour
So the answer is yes, but you have to modify it and play with the texture to get it right. Let me explain.
- You only use 3/4 cup of whole wheat for every 1 cup of flour substituted. AND,
- I’ve yet to use all whole wheat and am loving the flavor. I currently recommend substituting 50% whole wheat for the rest of the flour (again, using the measurements in step 1). AND,
- You’ll need to add another 2 Tablespoons of water for every 3/4 cup of whole wheat flour added.
- And don’t forget to factor in humidity, too.
I have yet to have an OMG YUM moment when making the recipe with a 100% whole wheat swap. It’s still too dense for my liking. Then again, 100% wheat bread tends to be thick in general (at least in my experience).
I’m still working on it, but I’m confident I can nail it and achieve the results I want and love.
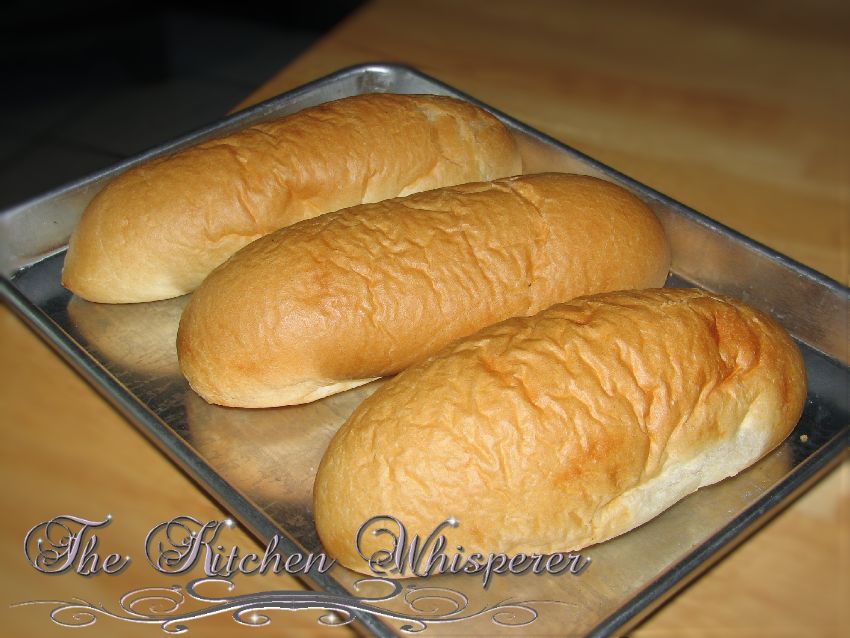
TKW Family Love
Ok, since finding this recipe a few weeks ago, I have made these at least once a week. I have made many many bread recipes before, but nothing that my family ever requested so much! Seriously, this recipe is amazing! And so forgiving! I’ve added extra flour, and too much water and I’ve tried every wash possible (our favorite is whole egg) and each time they are just outstanding. I’ve shared this post with quite a few friends as well. I’ll never buy rolls again.
Looking For More TKW Family Favorite Recipes?
These recipes are favorites of yours (and mine!) Check them out and see why thousands globally have fallen in love with them!
Best Super Soft and Chewy Hoagie Roll Recipe

The BEST soft and chewy bread roll for hoagies/submarine/grinders. Pillowy soft rolls that are begging to be filled with deliciousness!
- Prep Time: 2 hours
- Cook Time: 25 minutes
- Total Time: 2 hours 25 minutes
- Yield: 4-8 rolls depending on how big you want them
- Category: Bread
- Method: oven
- Cuisine: baking
Ingredients
- 3 1/2 – 4 cups bread flour (448–512 grams) *see note
- 1 1/4 cups plus 2 tablespoon – 1 1/2 cups warm water (110-115F degrees) / 325-355 grams *see note
- 2 Tablespoons / 25 grams of sugar
- 1 packet instant yeast (2 1/4 teaspoons of RedStar Platinum Yeast) / 7 grams
- 1 teaspoon kosher salt / 6 grams
- 4 Tablespoons / 56 grams cold unsalted butter, cubed *see note
Instructions
Using Active Dry Yeast? Start here
- Proof the Yeast: In the bowl of your stand mixer, whisk together the active dry yeast, sugar, and 1/4 cup plus 2 tablespoons of warm water. Let sit for 5 to 10 minutes until the mixture is foamy and bubbly.
- Initial Mix: To the same bowl, add 2 cups of flour and the remaining 1 cup of warm water. Attach the dough hook, set the mixer to low speed, and mix for 4 minutes.
- Continue Recipe: Skip to Step 1 of Recipe Continuation below to finish the dough!
Using Instant Yeast? Start here
- Initial Mix: In the bowl of a stand mixer fitted with the dough hook, add 2 cups of flour, the water, sugar, and instant yeast. Set the mixer to low speed and mix for 4 minutes.
- Continue Recipe: Skip to Step 1 of Recipe Continuation below to finish the dough!
Recipe Continuation
- Knead & Adjust Hydration: Increase mixer speed to medium. Add the salt and the remaining flour (1 cup at a time), mixing for 5 to 6 minutes, until the dough becomes slack (see note). If the dough is not slack after 5 to 6 minutes, add additional warm water 1 tablespoon at a time (up to 1/4 cup extra, for a total of 1 1/2 cups water). Note: The exact amount of extra water needed depends on your room’s humidity.
- Work in the Butter: Add the butter 1 tablespoon at a time, mixing until each tablespoon is almost fully incorporated before adding the next. Mix for 1 to 3 minutes total, until the dough comes back together and pulls completely away from the sides of the bowl, leaving a smooth, shiny surface.
- First Rise: Transfer the dough to a greased, covered bowl. Allow it to rise at room temperature for about 1 hour, or until doubled in size.
- Divide & Shape: Punch the dough down and turn it out onto a very lightly floured board. Divide into 4 to 8 equal pieces and shape as desired. Tip: Use as little flour as possible during shaping—too much flour will result in tough rolls.
- Second Rise: Place the shaped rolls onto a parchment-lined baking sheet and cover loosely with lightly greased plastic wrap. Let rise for 30 to 45 minutes, until almost doubled. Do not overproof, or the rolls will deflate in the oven.
- Bake: Preheat your oven to 375°F (190°C). Slash the tops of the rolls with a bread lame if desired, and apply an optional wash/brush coating. Bake for 16 to 23 minutes, until golden brown and the internal temperature reaches 200°F (93°C).
- Cool & Slice: Transfer to a wire rack and allow the rolls to cool completely before slicing with a sharp serrated bread knife.
Notes
Flour & Water
Depending on the type of bread flour as well as how humid your kitchen is you may need to increase the water to 1 1/2 cups (which is only another 2 tablespoons more than the original). At times I’ve had to actually go up to 1 3/4 cups total but that was due to how humid my house was at the time.
Cold Butter
I was raised using cold butter in this recipe though you may use softened or equal amounts of olive oil. When using cold butter, even though you ‘meld it into the flour’, you’re helping with gluten formation and the development of dough structure.
Slack Dough
Slack dough means when the dough cannot hold a shape; it has no elasticity or spring back at all. It’s a wet dough but not too wet. It’s “billowy”. The dough is super, super soft, and smooth.
Equipment
I would HIGHLY recommend using a quality bread knife to slice these as the rolls are soft and chewy and nothing is worse when cutting into them with a crappy knife! You’ll love this knife! Sani-Safe S162-8SC-PCP 8″ Scalloped Bread Knife with Polypropylene Handle Pan
Coating your bread
- Whole egg: this will give your bread a sheen and color
- Egg Yolk: this will give your bread color and will help brown it
- Egg White: Will give you a firmer crust
- Milk: will give your crust color
- Butter: will make your crust softer and richer












Leave a Reply